Difference between revisions of "PlayGo"
(→Create your First LSC Project) |
(→Run PlayGo with the Provided Workspace) |
||
| Line 13: | Line 13: | ||
=== Run PlayGo with the Provided Workspace === | === Run PlayGo with the Provided Workspace === | ||
| − | *[[ | + | ==== Startup PlayGo ==== |
| + | To start PlayGo, go to your <PlayGo> directory and double click the PlayGo.exe file. As it is in Eclipse, PlayGo will ask you for the workspace to start with. Choose the workspace provided with the installation (i.e. <PlayGo>/workspace/). | ||
| + | |||
| + | The <PlayGo>/workspace/ contains 4 projects: | ||
| + | |||
| + | *ATM – example for ATM System. The ATM GUI side is based on GWT. ATM behavior was modeled by Playing in a set of scenarios. S2A is used for generating aspects, which are used to monitor and run the system (Play-Out). | ||
| + | *GWTMemoryGame – Another example system. The Memory Game GUI side is based on GWT. Its behavior was modeled by Playing in a set of scenarios. S2A is used for generating aspects, which are used to monitor and run the system (Play-Out). | ||
| + | *il.ac.wis.cs.common – a library which contains few examples for creating LSC models by coding in Java. | ||
| + | *il.ac.wis.cs.playgo.guitoolkit – a platform library used by the ATM and GWTMemoryGame. This is integral part of PlayGo and in the future will be provided as a jar file only. | ||
| + | |||
| + | We will refer to these projects in the following chapters. | ||
| + | |||
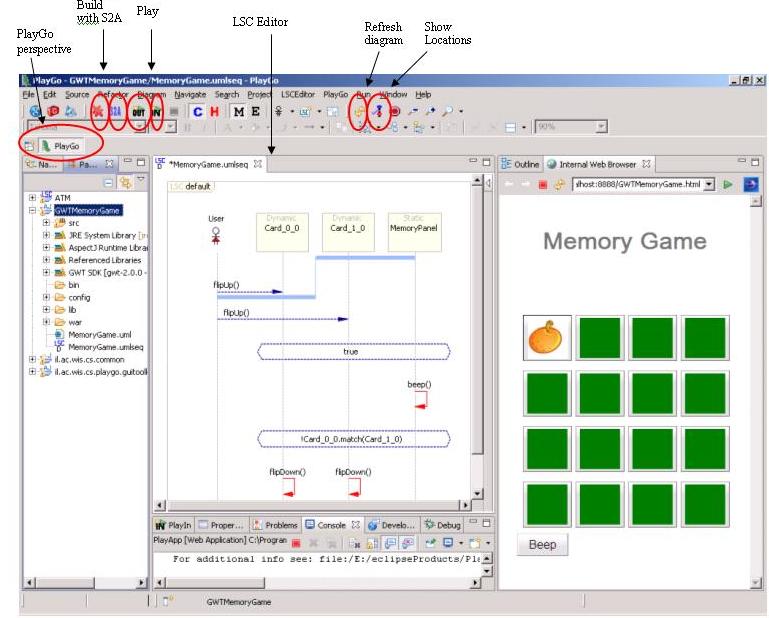
| + | Once PlayGo is open, note that the PlayGo perspective is selected. It is recommended to use this perspective, as it provides some shortcuts. | ||
| + | |||
| + | [[Image:playgo.perspective.JPG]] | ||
| + | |||
| + | |||
| + | [[Configure the Examples]] | ||
| + | |||
*[[Configure the Examples]] | *[[Configure the Examples]] | ||
*[[What You Can Do with the Provided Workspace]] | *[[What You Can Do with the Provided Workspace]] | ||
=== Create your First LSC Project === | === Create your First LSC Project === | ||
Revision as of 10:54, 3 September 2010
Contents
Getting Started with PlayGo
Install PlayGo
PlayGo is based on Eclipse and is packaged and provided as Eclipse Product. In addition to the product itself we provide a workspace with few examples.
To install PlayGo, create a new directory and extract the PlayGo.zip file to that newly created directory. Throughout this document we will refer to this directory as <PlayGo>.
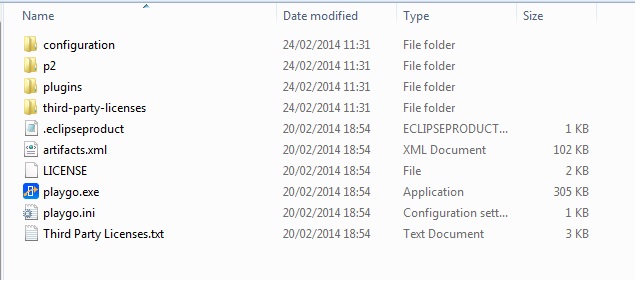
Once extracted, your <PlayGo> directory should have the following content:
JRE Configuration
Open the <PlayGo>/PlayGo.ini file and update the Java VM path to: <PlayGo>\ jre6\bin\ (e.g. D:\PlayGo\jre6\bin\). Alternatively, if you have Java 6 installed on your machine, simple remove the '-vm' parameter from the <PlayGo>\PlayGo.ini file. PlayGo will use your System properties to access your installed Java.
Run PlayGo with the Provided Workspace
Startup PlayGo
To start PlayGo, go to your <PlayGo> directory and double click the PlayGo.exe file. As it is in Eclipse, PlayGo will ask you for the workspace to start with. Choose the workspace provided with the installation (i.e. <PlayGo>/workspace/).
The <PlayGo>/workspace/ contains 4 projects:
- ATM – example for ATM System. The ATM GUI side is based on GWT. ATM behavior was modeled by Playing in a set of scenarios. S2A is used for generating aspects, which are used to monitor and run the system (Play-Out).
- GWTMemoryGame – Another example system. The Memory Game GUI side is based on GWT. Its behavior was modeled by Playing in a set of scenarios. S2A is used for generating aspects, which are used to monitor and run the system (Play-Out).
- il.ac.wis.cs.common – a library which contains few examples for creating LSC models by coding in Java.
- il.ac.wis.cs.playgo.guitoolkit – a platform library used by the ATM and GWTMemoryGame. This is integral part of PlayGo and in the future will be provided as a jar file only.
We will refer to these projects in the following chapters.
Once PlayGo is open, note that the PlayGo perspective is selected. It is recommended to use this perspective, as it provides some shortcuts.

