Difference between revisions of "Getting Started with PlayGo"
(→Run PlayGo with the provided workspace) |
|||
| Line 1: | Line 1: | ||
| − | == Install PlayGo == | + | == Install PlayGo == |
| − | + | ||
| − | + | PlayGo is based on Eclipse and is packaged and provided as an Eclipse Product. | |
| − | + | To install PlayGo, extract the downloaded zip file. The zip file contains a directory named PlayGo with the following content: | |
[[Image:Playgo.install.dir.JPG]] | [[Image:Playgo.install.dir.JPG]] | ||
| − | + | Throughout this section we refer to the newly extracted directory as <PlayGo>. | |
| − | + | ||
| − | == | + | == Startup PlayGo == |
| − | + | ||
| − | + | ||
| − | + | ||
| − | + | ||
| − | + | ||
| − | + | ||
| − | + | ||
| − | + | ||
| + | To start PlayGo, go to your <PlayGo> directory and double-click the PlayGo.exe file. As it is in Eclipse, PlayGo will ask you for the [[Eclipse Orientation#workspace|workspace]] to start with. Create a new workspace (e.g., <PlayGo>/workspace/) and select it.<br> | ||
| − | + | [[Troubleshoot#Error_when_launching_PlayGo|Troubleshoot...]] | |
| − | + | ||
| − | + | ||
| − | + | ||
| − | + | ||
| − | [[ | + | |
| − | + | ||
| − | + | ||
| − | + | ||
| − | + | ||
| − | + | ||
| − | == | + | == Create your first LSC project == |
| − | + | ||
| − | + | Creating a new LSC project is done from the 'File' menu: choose New --> LSC Project. Keep the flags checked and unchecked, as follows: <br><br>[[Image:New.LSC.project.JPG]] <br><br> [[Troubleshoot#LSC_perspective|Troubleshoot...]] <br><br> Start playing in, by selecting the project and clicking the 'NL Play-In':<br> [[Image:NL.play-in.start.png|800px]] <br><br> You will be prompted to select a name and location for the specification file, the file where the LSCs you create will be stored:<br> [[Image:SpecFile.png]] | |
| − | + | <br> Start entering your requirements. For each one, enter the LSC name and the requirement's text, and then click the [[Image:NL.plus.jpg]] button on the view toolbar to add the text you entered to the specification file. <br><br> For example, to create a sample "Hello World" scenario, you can enter the following text: <br><br> '''when the user clicks the button, the display text changes to "Hello World"''' <br><br>Type a space at the end of the sentence for it to parse. <br><br> Hover over the words that are marked with a green squiggly line, and select the first alternative from the quickfix box, by clicking it. The word will be interpreted and the corresponding object will be added to the system model view: <br> [[Image:GreenQuickFix.jpg]] <br><br> | |
| − | + | ||
| − | + | ||
| − | + | ||
| − | + | Clicking the [[Image:NL.plus.jpg]] button will then result in the following LSC: <br><br> [[Image:Specification.sampleProject.png|800px]] <br><br> | |
| − | + | [[How to Play-In|More about play-in...]] <br><br> | |
| − | [[Image: | + | Once done, stop the play-in session, by clicking the 'Stop' button on the toolbar. Click the 'Play-Out' button on the toolbar to start playing out:<br> [[Image:Toolbar.playout.png]] <br><br> As a result, a default GUI will be launched, from which you can play out (e.g., click the button and see the "Hello World" text in the display text field). |
| − | + | [[How to Play-Out|More about play-out...]] | |
| − | + | ||
| − | + | ||
| − | + | ||
| − | + | ||
| − | [[ | + | |
| − | + | ||
| − | + | ||
| − | + | ||
| − | + | ||
| − | + | ||
| − | + | ||
| − | + | ||
| − | + | ||
| − | + | ||
| − | + | ||
| − | + | ||
| − | + | ||
| − | + | ||
| − | + | ||
| − | + | ||
| − | + | ||
| − | + | ||
| − | + | ||
| − | + | ||
| − | + | ||
| − | + | ||
| − | + | ||
| − | + | ||
| − | + | ||
| − | + | ||
| − | + | ||
| − | + | ||
| − | + | ||
| − | + | ||
| − | + | ||
| − | + | ||
Revision as of 11:26, 2 January 2014
Install PlayGo
PlayGo is based on Eclipse and is packaged and provided as an Eclipse Product.
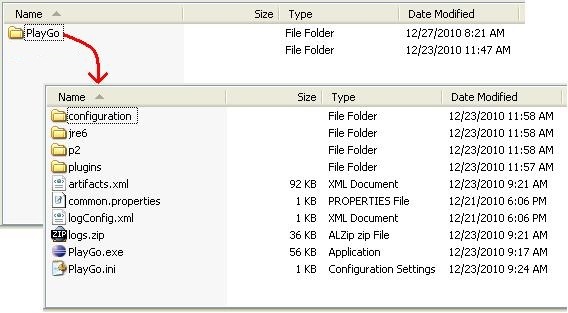
To install PlayGo, extract the downloaded zip file. The zip file contains a directory named PlayGo with the following content:
Throughout this section we refer to the newly extracted directory as <PlayGo>.
Startup PlayGo
To start PlayGo, go to your <PlayGo> directory and double-click the PlayGo.exe file. As it is in Eclipse, PlayGo will ask you for the workspace to start with. Create a new workspace (e.g., <PlayGo>/workspace/) and select it.
Create your first LSC project
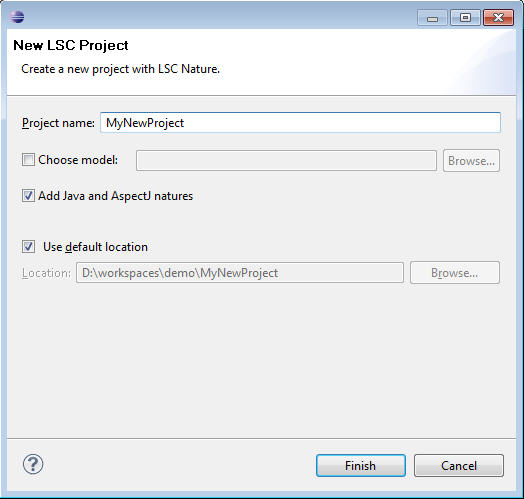
Creating a new LSC project is done from the 'File' menu: choose New --> LSC Project. Keep the flags checked and unchecked, as follows: 
Troubleshoot...
Start playing in, by selecting the project and clicking the 'NL Play-In':

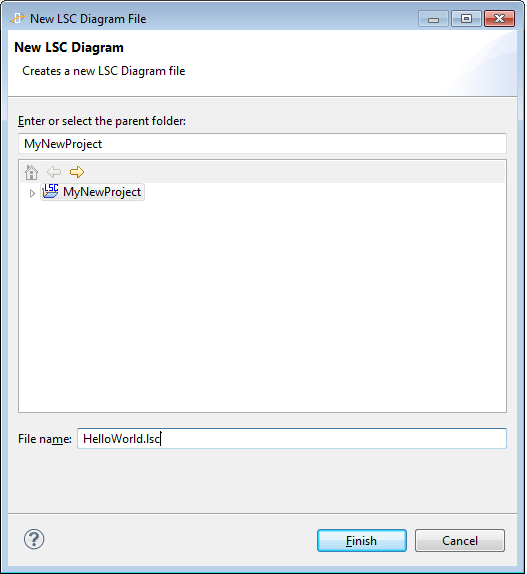
You will be prompted to select a name and location for the specification file, the file where the LSCs you create will be stored:

Start entering your requirements. For each one, enter the LSC name and the requirement's text, and then click the ![]() button on the view toolbar to add the text you entered to the specification file.
button on the view toolbar to add the text you entered to the specification file.
For example, to create a sample "Hello World" scenario, you can enter the following text:
when the user clicks the button, the display text changes to "Hello World"
Type a space at the end of the sentence for it to parse.
Hover over the words that are marked with a green squiggly line, and select the first alternative from the quickfix box, by clicking it. The word will be interpreted and the corresponding object will be added to the system model view:

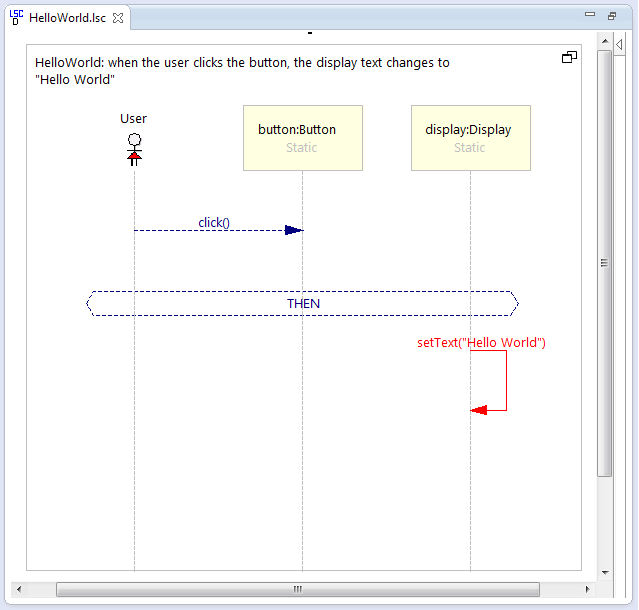
Clicking the ![]() button will then result in the following LSC:
button will then result in the following LSC:

Once done, stop the play-in session, by clicking the 'Stop' button on the toolbar. Click the 'Play-Out' button on the toolbar to start playing out:

As a result, a default GUI will be launched, from which you can play out (e.g., click the button and see the "Hello World" text in the display text field).
