Difference between revisions of "How to Play In"
| Line 38: | Line 38: | ||
<br> | <br> | ||
| + | === NL-Play-In Interface == | ||
To use [[PlayGo Feature List#Natural_language_play-in|NL play-in]], [[Create an LSC project|create an LSC project]], or select an existing one, and click the 'NL Play-In' button.<br><br> [[Image:NL.play-in.start.png|800px]]<br><br> | To use [[PlayGo Feature List#Natural_language_play-in|NL play-in]], [[Create an LSC project|create an LSC project]], or select an existing one, and click the 'NL Play-In' button.<br><br> [[Image:NL.play-in.start.png|800px]]<br><br> | ||
Revision as of 09:40, 22 October 2013
Contents
Natural language play-in
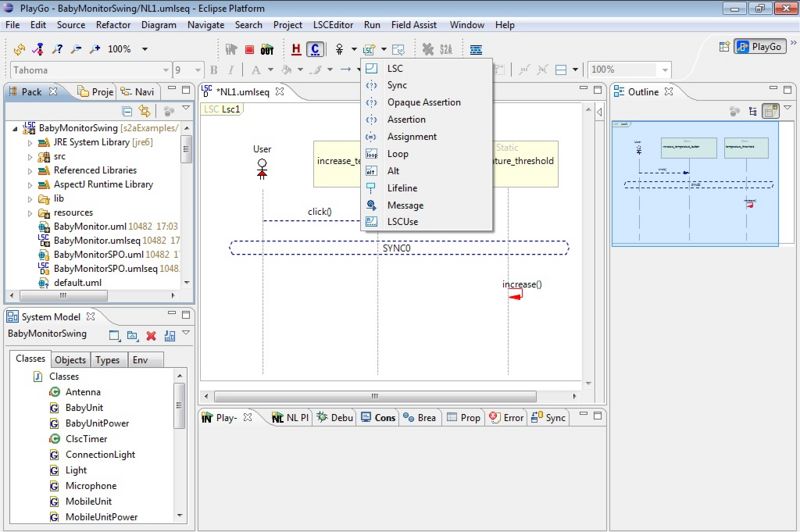
With natural language (NL) play-in, you can write scenarios in controlled natural language. For example, "When the user clicks the button, the light state turns to on". NL play-in then creates an LSC for this scenario, and inserts the corresponding entities into the System Model, if they are not there yet.

NL play-in: the underlined words in the NL sentence entered by the user are translated into the LSC chart and the appropriate System Model entities.
NL Rules
The scenarios specified in controlled NL have to conform to the following rules:
- A scenario must contain exactly one sentence.
- The sentence should contain a clear subject, verb, object and possibly adjective.These are translated into LSC constructs, such as lifelines, messages, properties and property values.
- Delimiters, like a comma, or words like 'then' or 'and' after each part of the sentence are important and must be included. For example:
- "when the user clicks the button, the display text changes to Hello"
- "when the user clicks the button then the display text changes to Hello"
- Values that are composed from more than one word should appear in double quotes. Single word values can appear without quotes. For example:
- "when the user clicks the button, the display mode changes to alarm"
- "when the user clicks the button, if the display mode is "alarm", the display mode changes to "alarm minutes" "
- Objects and methods cannot consist of more than one word (double quotes will not help here). By default, nouns are understood as objects, and verbs as methods. If there is other information from the system model, it will be integrated (e.g., if there is an object named 'walk', it can be understood as a noun or a verb). Also, non-words are by default nouns and are understood as objects or values. To use a non-word as a different construct, right click the word and set it using the right click menu. In the following example 'ReduceTemp' is not a noun, but rather a method. For the parse to recognize it, right click it, and set it to 'method'.
- "when the user clicks the button, the manager ReduceTemp."
- Property values can be of type String, Integer or Boolean, and are inferred either automatically or by the programmer using the quick fix mechanism.
- To refer to a specific object, use 'the'. To refer to a non-specific object, use 'a' or 'any'. For example:
- "when the user clicks the A_button, the display text changes to "Button A was clicked" ". This will create a static object 'A_button'.
- "when the user clicks a button, the button state changes to on". This will create a dynamic object 'button' that will bind at run time when clicked.
- If the NL refers to an object that already appears in the system model, the exact name of the object should be used, as it appears in the system model.
- Two basic phrases that add LSC constructs are a property change of an object and a method call.
- A sentence that describes a property that changes should include the <object name>, the <property name> and optionally the <new value>. For example:
- "when ..., the light state changes to on" (light.state = on).
- "when ..., the display color changes to the selection color" (display.color = selection.color).
- "when the light state changes, the ..." (the trigger is a change of the value to anything. light.state = *).
- A bad example is: "when ..., the light turns on", since "turns" is not recognized as a method. However, setting "turns" explicitly as a method, will make this sentence work, but it will generate a method call, e.g., light.turns(on), rather than the change of a property.
- A sentence that describes a method call should include the <object name> and the <method call>. For example:
- "when ..., the panel locks" (panel.lock()).
- "when the user clicks the button, ..." (button.click() triggered by the User source object).
- "when the dispenser makes tea, ..." (dispenser.make(tea)).
- A bad example is: "the heater temperature increases", since the heater.temperature is a property and cannot call the increase method.
- A sentence that describes a property that changes should include the <object name>, the <property name> and optionally the <new value>. For example:
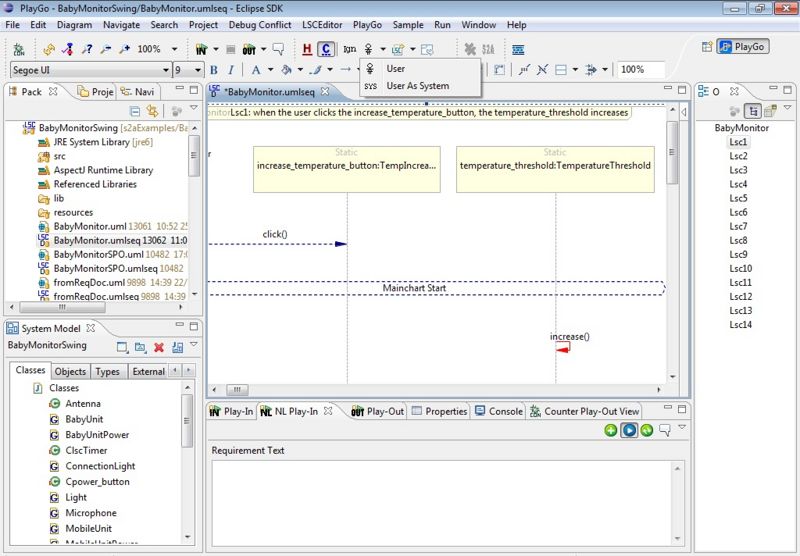
= NL-Play-In Interface
To use NL play-in, create an LSC project, or select an existing one, and click the 'NL Play-In' button.

This will cause the play-in session to start, and the 'NL Play-In' view will open. To play in, enter LSC name and the requirement: 
- LSC Name - the name of the LSC currently being played in.
- Requirement Text - the NL sentence defining the LSC.
- Add LSC - click this button to create the LSC when the requirement is complete.
- Online Parsing - this is a toggle button. When selected the text is parsed after each space entered. Otherwise, the text is parsed only when pressing Enter.
- Interact Enabled - this is a toggle button. When selected, interaction with the application GUI is interpreted as an NL snippet by the Show & Tell play-in module.
Quick fix mechanism
When NL play-in identifies problems in the requirement text, it activates a quick fix mechanism to mark them using a squiggly line and to prompt the user to fix them.
A Green squiggly line indicates a model warning or missing information. In some cases NL assigns defaults when information is missing.

To get more information on the error, hover over the underlined words with the mouse and a quickfix box will appear, describing the problem and offering possible solutions when they exist.
To select a solution, click on it and it will take effect:

A Red squiggly line indicates an ambiguity, i.e., that there is more than one possible parse for the sentence. The user should disambiguate by selecting one of the offered possibilities. The selection can obviously have a significant effect on the created LSC.

To get more information about the error, hover over the underlined words with the mouse and a quickfix box will appear describing the problem and offering possible solutions when they exist.
To select a solution, click on it and it will take effect. If no solution appears, or if you would like a different option from those appearing in the menu, edit the text to fix it yourself:

A Black squiggly line indicates a grammatical error, which must be fixed before continuing. In most cases, this involves incorrect grammar, a missing determinant, or words that are misspelled or not-recognized. No spell checking is applied in the current implementation. In the example below, the error is caused by the unrecognized word "doubleClicks":

To fix a grammatical error, look for the missing determinant and correct the sentence. In case of an unrecognized word, select the word by double-clicking it, then right-click it and select the relevant alternative to define and insert the word into the system model as an object, property, method or value:

Once the errors are fixed, you can create the LSC by pressing ENTER, or by clicking the ![]() button at the view toolbar:
button at the view toolbar:

Learn from Examples
Examples of requirements written in natural language, can be found here:
- wristwatch.
- chess
Basic play-in
To use Basic play-in, click the 'Basic Play-In' button.
Consequently, the play-in session starts. If a GUI exists it is launched, from which you can start play-in:
- Clicking an object in the GUI creates a diagram snippet reflecting the click.
- Use the Play-In toolbar to control some of the play-in operations, such as applying modality (hot/cold, monitor/execute):


- Insert new LSC elements, such as new LSC, new Instance, Assertion, Assignment etc…

- You may want to carry out operations on the GUI without affecting the LSC (e.g., for restoring the GUI to a state from which you want to play in). To do this, press the 'Ignore GUI Play-In' button, next to the 'Play-In Mode' drop-down button, and carry out the required operation. Once done, press the 'Ignore GUI Play-In' button again, to release it (in which case GUI operations will no longer be ignored):

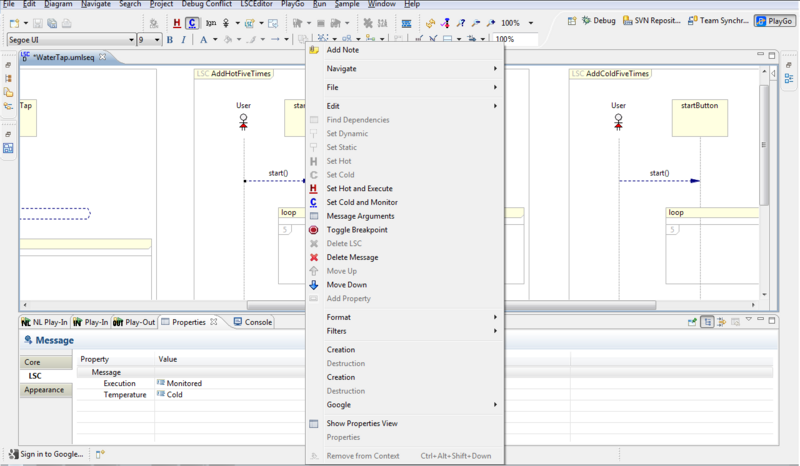
- Once created, LSC construct properties can be modified via the properties view and the right-click menu:

System model play-in
With system model play-in, you can enter scenarios by selecting an object from the system model, right-clicking it and selecting the required operation. For example, to add an event from the user to an object, right-click the corresponding object's method and select 'Call Message'. As a result, the corresponding LSC snippet will be created:

To play in from the system model, create an LSC project, or select an existing one. In either case, the LSC project has to have a system model. If it doesn't, create a system model and click the 'Basic Play-In' button to start playing in:

You will be prompted to select a specification file name and location:

- Note that you can play in from the system model also using the 'NL Play-In' and 'Show & Tell Play-in' alternatives.
Common operations
To add a message from the user to a system object, first make sure the 'Play-In Mode' is set to 'User'. Then, right-click a method of an object and select 'Call Message'. If the message requires input parameters, the 'Play-In' view will open, prompting the user to add the required message parameters:

To add a self message (from an object to itself), change the 'Play-In Mode' to 'System'. Then, right-click a method of an object and select 'Call Message'. If the message requires input parameters, the 'Play-In' view will open, prompting the user to add the required message parameters:

To add a message from one object to another, right-click the source object and select 'Call Other Object'. Then, right-click a method of the target object and select 'Call Message'. Once again, if the message requires input parameters, the 'Play-In' view will open, prompting the user to add the required message parameters:

