|
|
| (18 intermediate revisions by one user not shown) |
| Line 1: |
Line 1: |
| − | == Install PlayGo == | + | == Install PlayGo == |
| − | PlayGo is based on Eclipse and is packaged and provided as Eclipse Product. In addition to the product itself we provide a workspace with few examples.
| + | |
| | | | |
| − | To install PlayGo, create a new directory and extract the PlayGo.zip file to that newly created directory. Throughout this document we will refer to this directory as <PlayGo>.
| + | PlayGo is based on Eclipse and is packaged and provided as an Eclipse Product. |
| | | | |
| − | Once extracted, your <PlayGo> directory should have the following content:
| + | To install PlayGo, extract the downloaded zip file. The zip file contains a directory named PlayGo with the following content: |
| | | | |
| − | [[Image:Playgo.install.dir.JPG]] | + | [[Image:playgo.install.dir.jpg]] |
| | | | |
| | + | Throughout this section we refer to the newly extracted directory as <PlayGo>. |
| | | | |
| | + | == Startup PlayGo == |
| | | | |
| − | == Run PlayGo with the Provided Workspace ==
| + | To start PlayGo, go to your <PlayGo> directory and double-click the playgo.exe file. As it is in Eclipse, PlayGo will ask you for the [[Eclipse Orientation#workspace|workspace]] to start with. Create a new workspace (e.g., <PlayGo>/workspace/) and select it.<br> |
| − | === Startup PlayGo ===
| + | |
| − | To start PlayGo, go to your <PlayGo>/playgo/ directory and double click the PlayGo.exe file. As it is in Eclipse, PlayGo will ask you for the workspace to start with. Choose the workspace provided with the installation (i.e. <PlayGo>/workspace/). | + | |
| | | | |
| − | The <PlayGo>/workspace/ contains 4 projects:
| + | [[Troubleshoot#Error_when_launching_PlayGo|Troubleshoot...]] |
| | | | |
| − | *ATM – example for ATM System. The ATM GUI side is based on [http://code.google.com/webtoolkit/ GWT]. ATM behavior was modeled by Playing in a set of scenarios. S2A is used for generating aspects, which are used to monitor and run the system (Play-Out).
| + | == Create your first LSC project == |
| − | *Generic – Another example system. The Generic GUI side is based on Java Swing. Its behavior was modeled by Playing in a set of scenarios. S2A is used for generating aspects, which are used to monitor and run the system (Play-Out).
| + | |
| − | *il.ac.wis.cs.common – a library which contains few examples for creating LSC models using Java API.
| + | |
| − | *GWTMemoryGame – Another example system. The Memory Game GUI side is based on [http://code.google.com/webtoolkit/ GWT]. Its behavior was modeled by Playing in a set of scenarios. S2A is used for generating aspects, which are used to monitor and run the system (Play-Out).
| + | |
| − | *il.ac.wis.cs.common – a library which contains few examples for creating LSC models by coding in Java.
| + | |
| | | | |
| − | We will refer to these projects in the following sections.
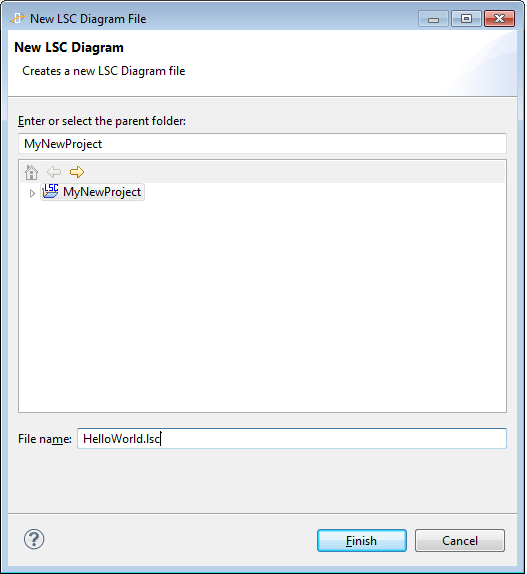
| + | Creating a new LSC project is done from the 'File' menu: choose New --> LSC Project. Keep the flags checked and unchecked, as follows: <br><br>[[Image:New.LSC.project.JPG]] <br><br> [[Troubleshoot#LSC_perspective|Troubleshoot...]] <br><br> Start playing in, by selecting the project and clicking the 'NL Play-In':<br> [[Image:NL.play-in.start.png|800px]] <br><br> You will be prompted to select a name and location for the specification file, the file where the LSCs you create will be stored:<br> [[Image:SpecFile.png]] |
| | | | |
| − | Once PlayGo is open, note that the PlayGo perspective is selected. It is recommended to use this perspective, as it provides some shortcuts.
| + | <br> Start entering your requirements. For each one, enter the LSC name and the requirement's text, and then click the [[Image:NL.plus.jpg]] button on the view toolbar to add the text you entered to the specification file. <br><br> For example, to create a sample "Hello World" scenario, you can enter the following text: <br><br> '''when the user clicks the button, the display text changes to "Hello World"''' <br><br>Type a space at the end of the sentence for it to parse. <br><br> Hover over the words that are marked with a squiggly line, and select an alternative from the quickfix box, by clicking it. The word will be interpreted and the corresponding object will be added to the system model view: <br> [[Image:GreenQuickFix1.jpg]] <br><br> |
| | | | |
| − | [[Image:playgo.perspective.JPG]] | + | Clicking the [[Image:NL.plus.jpg]] button will then result in the following LSC: <br><br> [[Image:Specification.sampleProject.png|800px]] <br><br> |
| | | | |
| − | === Configure the Examples ===
| + | [[How to Play-In|More about play-in...]] <br><br> |
| − | Since our examples are based on GWT, you need to configure the GWT settings before you can run the examples:
| + | |
| | | | |
| − | 1. From Window menu, choose Preferences->Google->Web Toolkit. Configure it to point to your <PlayGo>\plugins\com.google.gwt.eclipse.sdkbundle.2.0.0_2.0.0.v200912062003\gwt-2.0.0 directory:
| + | Once done, stop the play-in session, by clicking the 'Stop' button on the toolbar. Click the 'Play-Out' button on the toolbar to start playing out:<br><br> [[Image:Toolbar.playout.png]] <br><br> As a result, a default GUI will be launched, from which you can play out (e.g., click the button and see the "Hello World" text in the display text field). |
| | | | |
| − | [[Image:Gwt.preferences.jpg]] | + | [[How to Play-Out|More about play-out...]] |
| − | | + | |
| − | <br>
| + | |
| − | | + | |
| − | 2.From Window menu, choose Preferences->Google->App Engine. Configure it to point to your <PlayGo>\plugins\com.google.appengine.eclipse.sdkbundle.1.3.0_1.3.0.v200912141120\appengine-java-sdk-1.3.0 directory:
| + | |
| − | | + | |
| − | [[Image:Gwt.preferences2.jpg]]
| + | |
| − | | + | |
| − | <br>
| + | |
| − | | + | |
| − | [[S2A_Configuration | '''S2A Configuration''']]
| + | |
| − | | + | |
| − | === What You Can Do with the Provided Workspace ===
| + | |
| − | ====Run the Examples - Play-out====
| + | |
| − | The provided examples are configured and ready to be Played-out. Aspects are
| + | |
| − | already generated and Java-compiled. To Play-out, select an example project (e.g.
| + | |
| − | GWTMemoryGame) and click the 'Play-out' button on the toolbar.
| + | |
| − | As a result the Play-out server will start, the corresponding GWT application will
| + | |
| − | start and its URL will be copied to the Eclipse Internal Web Browser.
| + | |
| − | | + | |
| − | To Stop Play-out click the 'Stop' button on the toolbar, next to the 'Play-out' and
| + | |
| − | 'Play-in' buttons.
| + | |
| − | | + | |
| − | ===== Troubleshoot=====
| + | |
| − | If the example doesn’t seem to work, it is recommended to compile it
| + | |
| − | and then re-try.
| + | |
| − | For compiling it, select the example project and click the 'GWT Compile Project' button on the toolbar.
| + | |
| − | * If the problem persists, you can select the example project --> right click it and choose 'Debug as LSC'. This has the same effect as clicking the 'Play-out' button on the toolbar, but it sometimes works better…
| + | |
| − | | + | |
| − | * If the problem persists, make sure aspects were generated. To generate aspects, you should follow these steps (these steps should be done automatically by the 'Play-out' action when clicking 'Play-out' button on the toolbar):
| + | |
| − | ** Select the project you want to play-out.
| + | |
| − | ** Press the 'Build with S2A' icon in the toolbar or right click and chose 'Build with S2A'.
| + | |
| − | ** Refresh the project directory, to make sure Eclipse loaded the newly generated aspects.
| + | |
| − | | + | |
| − | ====Enrich the Examples with More Scenarios - Play-in====
| + | |
| − | For playing-in, select an example project (e.g. ATM) and click the 'Play-in' button on the toolbar. As a result the play-in server starts, the corresponding GWT application starts and its URL is copied to the Eclipse Internal Web Browser.
| + | |
| − | | + | |
| − | You can now start playing-in.
| + | |
| − | | + | |
| − | Note: For adding new LSC(s) to existing specification, open the specification
| + | |
| − | file (the .umlseq file) prior to starting the play-in process.
| + | |
| − | | + | |
| − | =====Troubleshoot=====
| + | |
| − | If play-out does not execute your newly created scenarios, try to re-load your modified model. This can be done by right clicking your project and selecting Properties --> S2A Builder. Remove the existing model by choosing it and clicking the 'Remove Model' and add the modified model, by clicking the 'Add Model' button and choosing the modified model.
| + | |
| − | | + | |
| − | =====How To...=====
| + | |
| − | Playing-in in PlayGo is sometimes a cumbersome task (and we are working on improving it). Below are some instructions for playing-in:
| + | |
| − | * Clicking an object in the GUI creates a diagram snippet reflecting that operation
| + | |
| − | * Use the Play-In toolbar to control some of the Play-In operation, such as:
| + | |
| − | ** Change temperature from Cold to Hot and vice versa
| + | |
| − | ** Change Execution from Monitor to Execute and vice versa[[Image:playin.toolbar1.JPG]]
| + | |
| − | ** Insert new LSC elements, such as new LSC, new Instance, Assertion, Assignment etc…[[Image:playin.toolbar2.JPG]]
| + | |
| − | **You may want to make operations on the GUI without affecting the LSC (such as for restoring the GUI to a state from which you want to play-in). For doing that change the 'Play-in Mode' to 'Ignore' and make the required operation. Once done change the 'Play-in Mode' back to 'User' or 'System':[[Image:playin.toolbar3.JPG]]
| + | |
| − | | + | |
| − | ====View the Model – in UML Editor and in LSC Editor====
| + | |
| − | The projects provided with the PlayGo workspace contain some UML models. You can view these models using the UML2Tools UML Editor, or using the LSC Editor.
| + | |
| − | * To view a model using the UML2Tools Editor, choose a .uml file --> right click --> Open With --> UML Model Editor.
| + | |
| − | * To view a model using LSC Editor double click a .umlseq file.
| + | |
| − | | + | |
| − | You can also generate a .umlseq file from a .uml file by right clicking a .uml file and choosing 'Initialize LSC Diagram'.
| + | |
| − | | + | |
| − | ====Debug Capabilities====
| + | |
| − | When playing-out an example, it is executed in debug mode. Thus you see at runtime the LSC diagram with additional debugging information, such as the Cut:
| + | |
| − | [[Image:debug.jpg]]
| + | |
| − | You can right click a message and toggle a Breakpoint. The LSC debugger will stop on breakpoint. To continue, choose Resume from the Debug View.
| + | |
| − | Please be advised that the debugger is in incubation stage, and as such it has only limited capabilities.
| + | |
| − | | + | |
| − | =====Troubleshot=====
| + | |
| − | If you experience some display problems in the LSC Editor, use the 'refresh' toolbar button.
| + | |
| − | | + | |
| − | ====Modify using LSC Editor, Compile and Run====
| + | |
| − | You can modify your model, by opening the .umlseq file and edit the model in the LSC Editor. The LSC Editor has limited functionality. At this point you can do the following:
| + | |
| − | * Add new Interaction (LSC)
| + | |
| − | * Add elements to the end of an existing interaction
| + | |
| − | * Change properties of existing elements, from the Properties View.
| + | |
| − | * Delete a message by clicking it and pressing the delete keyboard button.
| + | |
| − | [[Image:view.properties.jpg]]
| + | |
| − | | + | |
| − | Deletion of other LSC elements is not supported yet... However if you want to delete elements or change the order of elements, or do other things that are not supported in the LSC Editor, you can do it from the UML Editor.
| + | |
| − | It is recommended to backup the model (.uml file) prior to making such manual changes.
| + | |
| − | | + | |
| − | You can affect the way elements are displayed by changing some values in the Preferences. From the Windows menu select Preferences --> PlayGo --> LSCEditor:
| + | |
| − | | + | |
| − | [[Image:preferences.lsceditor.jpg]]
| + | |
| − | | + | |
| − | ====Create a New Model by Coding====
| + | |
| − | You can create new LSCs by code. The il.ac.wis.cs.common project contains an example for creating LSCs by Java-coding. You can use this example as reference for creating your own new models.
| + | |
| − | The process for creating the model is as follows:
| + | |
| − | | + | |
| − | 1. Write the code for creating your model – refer to CreateMemoryGameModel as a reference.
| + | |
| − | | + | |
| − | 2. Run your newly created code. As a result a new .uml file will be created in your <PlayGo>/workspace/il.ac.wis.cs.common/model/ directory.
| + | |
| − | | + | |
| − | 3. If you wish to view the LSC diagram, right click the .uml file and choose 'Initialize LSC Diagram'. As a result a new .umlseq file will be generated and the LSC diagram will open in the LSC Editor.
| + | |
| − | | + | |
| − | You can now take the model and compile it with S2A.
| + | |
| − | | + | |
| − | See the section 'Create your First LSC Project' below for step-by-step instructions.
| + | |
| − | | + | |
| − | ====Generate Tracer Logs====
| + | |
| − | In order to generate Tracer logs open the musdmonitor.properties file located under the resources/ directory inside your example project, and make sure the value of the monitorLevel property is set to 1 (if 0 no log will be generated). Next time you run your application tracing information will be collected and written into the monitor.log which is located directly under your project folder.
| + | |
| − | | + | |
| − | The generated log files can be explored using the [[The Tracer | Tracer]].
| + | |
| − | | + | |
| − | == Create your First LSC Project ==
| + | |
| − | This chapter provides instructions for creating LSC project. It does not refer to creating a GUI application (from which one can Play-in and Play-out).
| + | |
| − | * Create LSC project: From the file menu choose New --> LSC Project. Note: if you're not using the PlayGo perspective you may not see this option, in which case choose New --> Other --> PlayGo category --> LSC Project. Keep the flags checked, as follows:
| + | |
| − | [[Image:New.LSC.project.JPG]]
| + | |
| − | *Create LSC model, by coding (preferred), or by diagramming.
| + | |
| − | ** Refer to ‘Create a New Model by Coding’ above for details
| + | |
| − | * Add the target Java UI application source files or jar file to the project
| + | |
| − | *Configure S2A builder properties
| + | |
| − | ** Specifically define the location to which aspects need to be generated.
| + | |
| − | ** You may also need to configure the Java build path – depending on the code of your application.
| + | |
| − | ** Add dependency of S2ARuntime jar file. This jar is located in the /lib folder inside your LSC project.
| + | |
| − | * Build with S2A: Right click the project and select Build with S2A. When compilation completes you may need to press F5 to refresh the aspects folder (otherwise they will be ignored).
| + | |
| − | * Build your project
| + | |
| − | * Run the application or right click it and choose 'Debug as LSC'.
| + | |
| − | * To generate Tracer logs, create a folder resources/ under your project's home folder. Create the musdmonitor.properties file and locate it under the newly created resources folder. The musdmonitor,properties file should have the following content (can be copied from one of the example projects provided with the PlayGo installation):[[Image:musdmonitor.jpg]]
| + | |
| − | ** Note that if you want to monitor specific interaction(s) you should replace the '''interactions=*''' entry with an entry of the following format: '''interactions=<name of interaction #1>; <name of interaction #2>; …; <name of interaction #n>'''
| + | |
PlayGo is based on Eclipse and is packaged and provided as an Eclipse Product.
To install PlayGo, extract the downloaded zip file. The zip file contains a directory named PlayGo with the following content:
Throughout this section we refer to the newly extracted directory as <PlayGo>.
To start PlayGo, go to your <PlayGo> directory and double-click the playgo.exe file. As it is in Eclipse, PlayGo will ask you for the workspace to start with. Create a new workspace (e.g., <PlayGo>/workspace/) and select it.
Creating a new LSC project is done from the 'File' menu: choose New --> LSC Project. Keep the flags checked and unchecked, as follows:
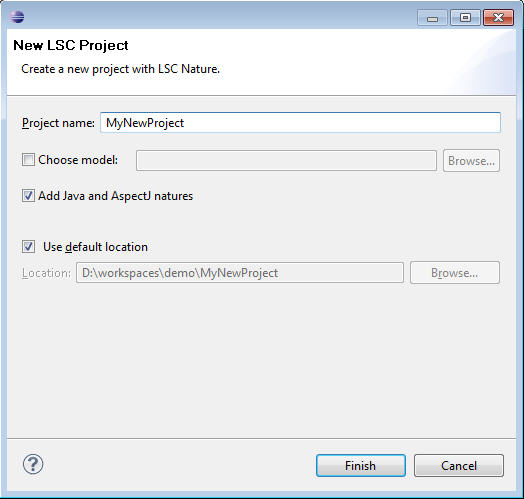
Troubleshoot...
Start playing in, by selecting the project and clicking the 'NL Play-In':

You will be prompted to select a name and location for the specification file, the file where the LSCs you create will be stored:
Once done, stop the play-in session, by clicking the 'Stop' button on the toolbar. Click the 'Play-Out' button on the toolbar to start playing out:

As a result, a default GUI will be launched, from which you can play out (e.g., click the button and see the "Hello World" text in the display text field).


