|
|
| (63 intermediate revisions by one user not shown) |
| Line 1: |
Line 1: |
| − | == Install PlayGo == | + | == Install PlayGo == |
| − | PlayGo is based on Eclipse and is packaged and provided as Eclipse Product. In addition to the product itself we provide a workspace with few examples.
| + | |
| | | | |
| − | To install PlayGo, create a new directory and extract the PlayGo.zip file to that newly created directory. Throughout this document we will refer to this directory as <PlayGo>.
| + | PlayGo is based on Eclipse and is packaged and provided as an Eclipse Product. |
| | | | |
| − | Once extracted, your <PlayGo> directory should have the following content:
| + | To install PlayGo, extract the downloaded zip file. The zip file contains a directory named PlayGo with the following content: |
| | | | |
| − | [[Image:Playgo.install.dir.jpg]] | + | [[Image:playgo.install.dir.jpg]] |
| | | | |
| − | === JRE Configuration ===
| + | Throughout this section we refer to the newly extracted directory as <PlayGo>. |
| − | Open the <PlayGo>/PlayGo.ini file and update the Java VM path to: <PlayGo>\ jre6\bin\ (e.g. D:\PlayGo\jre6\bin\). Alternatively, if you have Java 6 installed on your machine, simple remove the '-vm' parameter from the <PlayGo>\PlayGo.ini file. PlayGo will use your System properties to access your installed Java.
| + | |
| | | | |
| − | == Run PlayGo with the Provided Workspace ==
| + | == Startup PlayGo == |
| − | === Startup PlayGo ===
| + | |
| − | To start PlayGo, go to your <PlayGo> directory and double click the PlayGo.exe file. As it is in Eclipse, PlayGo will ask you for the workspace to start with. Choose the workspace provided with the installation (i.e. <PlayGo>/workspace/).
| + | |
| | | | |
| − | The <PlayGo>/workspace/ contains 4 projects:
| + | To start PlayGo, go to your <PlayGo> directory and double-click the playgo.exe file. As it is in Eclipse, PlayGo will ask you for the [[Eclipse Orientation#workspace|workspace]] to start with. Create a new workspace (e.g., <PlayGo>/workspace/) and select it.<br> |
| | | | |
| − | *ATM – example for ATM System. The ATM GUI side is based on GWT. ATM behavior was modeled by Playing in a set of scenarios. S2A is used for generating aspects, which are used to monitor and run the system (Play-Out).
| + | [[Troubleshoot#Error_when_launching_PlayGo|Troubleshoot...]] |
| − | *GWTMemoryGame – Another example system. The Memory Game GUI side is based on GWT. Its behavior was modeled by Playing in a set of scenarios. S2A is used for generating aspects, which are used to monitor and run the system (Play-Out).
| + | |
| − | *il.ac.wis.cs.common – a library which contains few examples for creating LSC models by coding in Java.
| + | |
| − | *il.ac.wis.cs.playgo.guitoolkit – a platform library used by the ATM and GWTMemoryGame. This is integral part of PlayGo and in the future will be provided as a jar file only.
| + | |
| | | | |
| − | We will refer to these projects in the following chapters.
| + | == Create your first LSC project == |
| | | | |
| − | Once PlayGo is open, note that the PlayGo perspective is selected. It is recommended to use this perspective, as it provides some shortcuts.
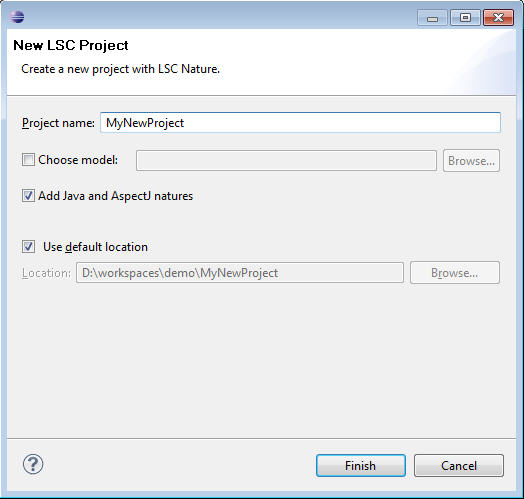
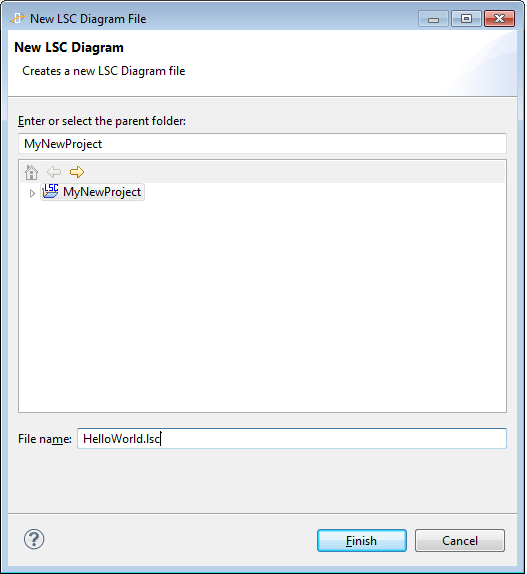
| + | Creating a new LSC project is done from the 'File' menu: choose New --> LSC Project. Keep the flags checked and unchecked, as follows: <br><br>[[Image:New.LSC.project.JPG]] <br><br> [[Troubleshoot#LSC_perspective|Troubleshoot...]] <br><br> Start playing in, by selecting the project and clicking the 'NL Play-In':<br> [[Image:NL.play-in.start.png|800px]] <br><br> You will be prompted to select a name and location for the specification file, the file where the LSCs you create will be stored:<br> [[Image:SpecFile.png]] |
| | | | |
| − | [[Image:playgo.perspective.JPG]] | + | <br> Start entering your requirements. For each one, enter the LSC name and the requirement's text, and then click the [[Image:NL.plus.jpg]] button on the view toolbar to add the text you entered to the specification file. <br><br> For example, to create a sample "Hello World" scenario, you can enter the following text: <br><br> '''when the user clicks the button, the display text changes to "Hello World"''' <br><br>Type a space at the end of the sentence for it to parse. <br><br> Hover over the words that are marked with a squiggly line, and select an alternative from the quickfix box, by clicking it. The word will be interpreted and the corresponding object will be added to the system model view: <br> [[Image:GreenQuickFix1.jpg]] <br><br> |
| | | | |
| | + | Clicking the [[Image:NL.plus.jpg]] button will then result in the following LSC: <br><br> [[Image:Specification.sampleProject.png|800px]] <br><br> |
| | | | |
| − | === Configure the Examples ===
| + | [[How to Play-In|More about play-in...]] <br><br> |
| − | Before you can compile and run the examples, you need to configure them:
| + | |
| | | | |
| − | <span style="font-size: larger"><big>1. </big></span>From Window menu, choose Preferences->Google->Web Toolkit. Configure it to point to your <PlayGo>\plugins\com.google.gwt.eclipse.sdkbundle.2.0.0_2.0.0.v200912062003\gwt-2.0.0 directory:
| + | Once done, stop the play-in session, by clicking the 'Stop' button on the toolbar. Click the 'Play-Out' button on the toolbar to start playing out:<br><br> [[Image:Toolbar.playout.png]] <br><br> As a result, a default GUI will be launched, from which you can play out (e.g., click the button and see the "Hello World" text in the display text field). |
| | | | |
| − | [[Image:Gwt.preferences.jpg]] | + | [[How to Play-Out|More about play-out...]] |
| − | | + | |
| − | <br>
| + | |
| − | | + | |
| − | <big>2.</big> From Window menu, choose Preferences->Google->App Engine. Configure it to point to your <PlayGo>\plugins\com.google.appengine.eclipse.sdkbundle.1.3.0_1.3.0.v200912141120\appengine-java-sdk-1.3.0 directory:
| + | |
| − | | + | |
| − | [[Image:Gwt.preferences2.jpg]]
| + | |
| − | | + | |
| − | <br>
| + | |
| − | | + | |
| − | <big>3.</big> From Window menu, choose Preferences->Java->Build PathClasspath Variables. Edit the PLAYGO_PLUGINS variable to point to your <PlayGo>/plugins/ directory:
| + | |
| − | | + | |
| − | [[Image:Classpath.references.jpg]]
| + | |
| − | | + | |
| − | <br>
| + | |
| − | | + | |
| − | <big>4.</big> Basically the examples provided are configured with relative paths and should work well in your environment, but this is a good opportunity to introduce some parts of the configuration you can control. Right click the GWTMemoryGame project->Properties->S2A Builder:
| + | |
| − | | + | |
| − | [[Image:Playgo.s2a.properties.jpg]]
| + | |
| − | | + | |
| − | As shown in the screenshot above, there are 3 tabs in which you can configure properties related to S2A:
| + | |
| − | | + | |
| − | A. S2A Compilation
| + | |
| − | | + | |
| − | i. Here you can add and remove models which you want to compile with S2A.
| + | |
| − | | + | |
| − | For those models you add, you may choose which LSCs should be compiled by S2A. In other words, for which Interactions S2A will generate aspects.
| + | |
| − | | + | |
| − | ii. Target Folder: here you specify the directory in which the generated aspects will be located.
| + | |
| − | iii. Clear Automatically – if on, cleans the aspects directory before generating new aspects.
| + | |
| − | iv. Polymorphism – enable or disable polymorphism.
| + | |
| − | | + | |
| − | B. Imports
| + | |
| − | | + | |
| − | i. Here you may specify packages that will be imported in the generated aspects.
| + | |
| − | ii. Output package name – the package of the generated aspects.
| + | |
| − | | + | |
| − | C. General – currently used only for specifying the log4j configuration location.
| + | |
| − | | + | |
| − | <big></big>
| + | |
| − | | + | |
| − | <big>5.</big> S2A preferences – Advanced From the Windows menu, select Preferences->PlayGo->S2A Builder
| + | |
| − | | + | |
| − | [[Image:Playgo.s2a.properties.advanced.jpg]]
| + | |
| − | | + | |
| − | <br>Here you can choose the strategy you want to activate. Currently the only strategy implemented is the Naive strategy and this is the one being used.
| + | |
| − | | + | |
| − | | + | |
| − | === What You Can Do with the Provided Workspace ===
| + | |
| − | ====1. Run the Examples - Play-out====
| + | |
| − | The provided examples are configured and ready to be Played-out. Aspects are
| + | |
| − | already generated and Java-compiled. To Play-out, select an example project (e.g.
| + | |
| − | GWTMemoryGame) and click the 'Play-out' button on the toolbar.
| + | |
| − | As a result the Play-out server will start, the corresponding GWT application will
| + | |
| − | start and its URL will be copied to the Eclipse Internal Web Browser.
| + | |
| − | | + | |
| − | To Stop Play-out click the 'Stop' button on the toolbar, next to the 'Play-out' and
| + | |
| − | 'Play-in' buttons.
| + | |
| − | | + | |
| − | ===== Troubleshoot=====
| + | |
| − | If the example doesn’t seem to work, it is recommended to compile it
| + | |
| − | and then re-try.
| + | |
| − | For compiling it, select the example project and click the 'GWT Compile Project' button on the toolbar.
| + | |
| − | * If the problem persists, you can select the example project --> right click
| + | |
| − | it and choose 'Debug as LSC'. This has the same effect as clicking the
| + | |
| − | 'Play-out' button on the toolbar, but it sometimes works better…
| + | |
| − | | + | |
| − | * If the problem persists, make sure aspects were generated. To generate aspects, you should follow these steps (these steps should be done automatically by the 'Play-out' action when clicking 'Play-out' button on the toolbar):
| + | |
| − | ** Select the project you want to play-out.
| + | |
| − | ** Press the 'Build with S2A' icon in the toolbar or right click and chose 'Build with S2A'.
| + | |
| − | ** Refresh the project directory, to make sure Eclipse loaded the newly generated aspects.
| + | |
| − | | + | |
| − | ====2. Enrich the Examples with More Scenarios - Play-in====
| + | |
| − | For playing-in, select an example project (e.g. ATM) and click the 'Play-in' button on the toolbar. As a result the play-in server starts, the corresponding GWT application starts and its URL is copied to the Eclipse Internal Web Browser.
| + | |
| − | | + | |
| − | You can now start playing-in.
| + | |
| − | | + | |
| − | Note: For adding new LSC(s) to existing specification, open the specification
| + | |
| − | file (the .umlseq file) prior to starting the play-in process.
| + | |
| − | | + | |
| − | =====Troubleshoot=====
| + | |
| − | If play-out does not execute your newly created scenarios, try to re-load your modified model. This can be done by right clicking your project and selecting Properties --> S2A Builder. Remove the existing model by choosing it and clicking the 'Remove Model' and add the modified model, by clicking the 'Add Model' button and choosing the modified model.
| + | |
| − | | + | |
| − | Playing-in in PlayGo is sometimes a cumbersome task (and we are working on improving it). Below are some instructions for playing-in:
| + | |
| − | * Clicking an object in the GUI creates a diagram snippet reflecting that
| + | |
| − | operation
| + | |
| − | * Use the Play-In toolbar icon to control some of the Play-In operation, such as:
| + | |
| − | | + | |
| − | == Create your First LSC Project ==
| + | |
PlayGo is based on Eclipse and is packaged and provided as an Eclipse Product.
To install PlayGo, extract the downloaded zip file. The zip file contains a directory named PlayGo with the following content:
Throughout this section we refer to the newly extracted directory as <PlayGo>.
To start PlayGo, go to your <PlayGo> directory and double-click the playgo.exe file. As it is in Eclipse, PlayGo will ask you for the workspace to start with. Create a new workspace (e.g., <PlayGo>/workspace/) and select it.
Creating a new LSC project is done from the 'File' menu: choose New --> LSC Project. Keep the flags checked and unchecked, as follows:
Troubleshoot...
Start playing in, by selecting the project and clicking the 'NL Play-In':

You will be prompted to select a name and location for the specification file, the file where the LSCs you create will be stored:
Once done, stop the play-in session, by clicking the 'Stop' button on the toolbar. Click the 'Play-Out' button on the toolbar to start playing out:

As a result, a default GUI will be launched, from which you can play out (e.g., click the button and see the "Hello World" text in the display text field).


